One of the best things about GoGo Tools is that you actually own your data. Instead of us storing your information on a centralized server and charging you a monthly fee to access it, our apps use a custom Google Apps Script to turn your personal Google Drive into a private, powerful backend database.
Deploying this backend code sounds like something meant for software engineers, but we've streamlined the entire process. If you can click a few buttons, you can deploy your own private server in under five minutes. Here is exactly how to do it.
Step 1: Secure Your Master Sheet
Immediately after purchasing your lifetime license on LemonSqueezy, you will receive an email containing your unique License Key and a secure download link.
- Click the download link in your receipt email. This will open a special Google Drive page.
- You will be presented with an option to "View Code" or "Make a copy". Always choose Make a copy.
- This action instantly clones the master Google Sheet (which contains our proprietary backend code hidden inside it) directly into your personal Google Drive where no one else can touch it.
Step 2: Run the Install Wizard
Now that the sheet is safely in your Drive, we need to let it build your folder structure.
- Open the newly copied Google Sheet.
- A custom Install Wizard popup will appear automatically on your screen. Follow the on-screen instructions.
- Google will ask you to grant the script permission to run. Because you own this script and it isn't published to the public Google Marketplace, you will see an "Unverified App" warning. Click Advanced, and then click Go to [App Name] (unsafe) to proceed.
- Grant the requested permissions. The wizard will now automatically build the required folder structures for your app in your personal Drive.
Step 3: Deploy the Script
The sheet is ready, but we need to turn it into a "listening" server so your web app (like GoGo Tracker) can talk to it.
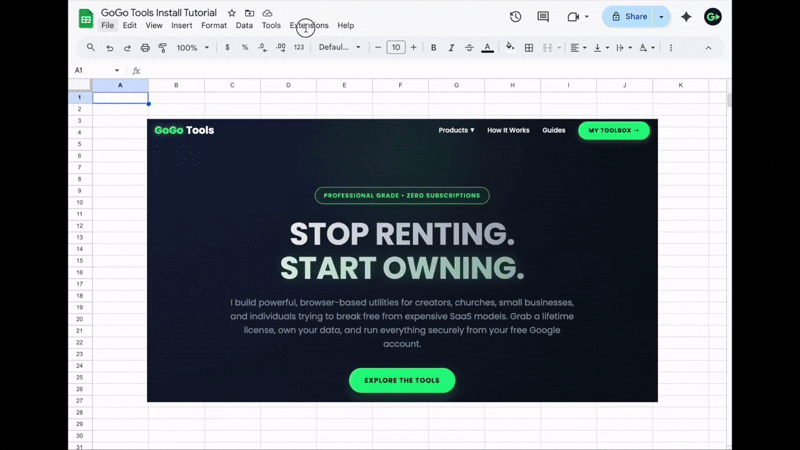
- In your Google Sheet menu bar, click Extensions and select Apps Script. A new tab will open showing your backend code.
- In the top right corner of the Apps Script window, click the blue Deploy button, then select New deployment.
- Click the small gear icon next to "Select type" and choose Web app.
- Give your project a name in the description box (e.g., "GoGo Tracker Backend").
- CRITICAL STEP: Set "Execute as" to Me. (This ensures data saves to your drive).
- CRITICAL STEP: Set "Who has access" to Anyone. (This allows your web app on your phone to talk to the script without forcing you to log into Google every time).
- Click Deploy and copy the generated Web app URL.
Step 4: Connect Your Toolbox
You have your backend URL, and you have your license key. Now we just introduce them to each other.
- Head over to gogotools.net/toolbox.
- Paste your License Key (from your LemonSqueezy email).
- Paste your Web App URL (from Step 3).
- Click Save. Your app is fully activated, deployed, and ready to use!